Thursday, September 12, 2013
Good Neighbors
I live in a really great neighborhood. I am so grateful for the friendship I have with so many of my neighbors. When our house flooded, we had about 30 people come to our immediate rescue to help move all of our belongings out of the house, bring us dinner, and look after our kids. Some neighbors let us live in their house while they were on vacation, and a few others put us up on their spare beds and couches until we found somewhere else to stay. Since then we have had help with dinners, cleaning, unpacking, and weeding the garden. I even had a friend pick peaches from my tree, can them, and bring me the bottled peaches. We have been very blessed.
Monday, February 11, 2013
I Can't Wait for Spring!!
I have been dreaming about gardening. I can hardly wait until all that snow melts off and I can get my hands in the dirt again! I went to the garden store this week and got some crocus, hyacinth, and tulip bulbs on a super clearance. I don't know if I'll be able to get them in the ground or not (frozen solid?), and they may not flower this year, but we'll see!
In the fall my neighbor gave me all her "junk" from clearing out her overgrowth in her back yard. I planted some things in my grow boxes and got several nice big piles of dead plants to work into compost. She was happy she didn't have to fill her garbage can; I'm happy to have the compost. Win-win.
Come on, spring time! I'm ready.
Wednesday, January 2, 2013
Christmas Card Gift Boxes
I'm a day late and dollar short on this post, but oh well! Treasure it up in your memory for next Christmas.
This is how to make little boxes out of old Christmas cards.
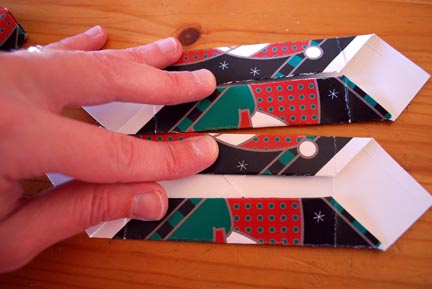
 Start by cutting the front off the back of the card.

 Begin making the box bottom with the back of the card. (In the pictures you will see a card front for illustration purposes.) Turn the card over. Fold all corners into the center. You can use a ruler to draw lines from corner to corner to find the middle, or fold two corners in at the same time, making sure their edges are the same length.
 Open out two of the sides. Fold up the edges of the top and bottom to meet at the middle. Make your folds nice and crisp by running the handle of your scissors across. (Or you can use a bone folder if you have one.)
 Unfold everything, and then turn it 90 degrees. Repeat with the remaining edges.
 Open everything up. Using scissors, cut in on each side from the center of the edge to where the first folds cross over making a square angle.
 Fold up the corners like in the following picture:
 Raise the edges to make the top and bottom walls, and push in the little triangle corners. Bring up the sides over the triangle corners, and tuck them into the center of the box.
 Here is the finished bottom of the box.
 Repeat all steps with the front of the card for the box top. You will need to make it slightly larger. This is done at the step where you fold the edges into the center. Instead of folding all the way to the middle, fold it just a bit away from the middle. In the following picture, the top card is for the box bottom, and the bottom card is for the box top.
 The designs on the picture show how one is slightly larger, even though the original squares were the same size.
 One should fit into the other.

This is how to make little boxes out of old Christmas cards.
Cut both sides square. You can measure with ruler and draw lines, or use the card front and back turned opposite directions for a guide.
Subscribe to:
Posts (Atom)