Showing posts with label Creative Arts. Show all posts

Wednesday, January 2, 2013

Christmas Card Gift Boxes

I'm a day late and dollar short on this post, but oh well!  Treasure it up in your memory for next Christmas.
This is how to make little boxes out of old Christmas cards.

Start by cutting the front off the back of the card.
Cut both sides square.  You can measure with ruler and draw lines, or use the card front and back turned opposite directions for a guide.
Begin making the box bottom with the back of the card.  (In the pictures you will see a card front for illustration purposes.) Turn the card over.  Fold all corners into the center.  You can use a ruler to draw lines from corner to corner to find the middle, or fold two corners in at the same time, making sure their edges are the same length.
Open out two of the sides.  Fold up the edges of the top and bottom to meet at the middle.  Make your folds nice and crisp by running the handle of your scissors across.  (Or you can use a bone folder if you have one.)
Unfold everything, and then turn it 90 degrees.  Repeat with the remaining edges.
Open everything up.  Using scissors, cut in on each side from the center of the edge to where the first folds cross over making a square angle.
Fold up the corners like in the following picture:
Raise the edges to make the top and bottom walls, and push in the little triangle corners.  Bring up the sides over the triangle corners, and tuck them into the center of the box.
Here is the finished bottom of the box.
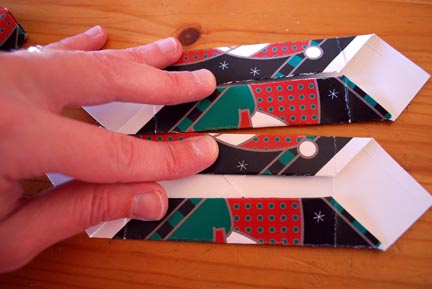
Repeat all steps with the front of the card for the box top.  You will need to make it slightly larger. This is done at the step where you fold the edges into the center.  Instead of folding all the way to the middle, fold it just a bit away from the middle.  In the following picture, the top card is for the box bottom, and the bottom card is for the box top.
The designs on the picture show how one is slightly larger, even though the original squares were the same size.
One should fit into the other.

Thursday, February 9, 2012

Heart Shaped Crayons

Instead of candy this year, my kids will be passing these crayon valentines to their friends.  They are fun and unique, and help clean out the crayon box as well.  This silicone baking tray is available from Wilton.  You can probably get one at your local craft store.  Just fill each cup with broken crayons like so:
Place it on a baking sheet and heat in a 200 degree oven for about 20-25 minutes.  The crayons need not be completely melted because you can use a toothpick to push down any lumps into the liquid.  The first time I tried this project, I must have left them in way too long because the wax separated quite a bit.  The crayons had a rather thick layer of wax at the top that did not color on paper, and some of the wax actually absorbed through the silicone and coated the outside of the cups.  It was quite difficult to clean, and I don't think I'll be using this tray for making food anymore.  Taking them out sooner this time made a big difference.  There was still a layer of wax on the top, but it was very thin this time.
Allow the crayons to cool and harden.  I set the tray outside (it is freezing here) for a little while to speed it up.  Pop the crayons out of the mold.  If you like, you can rub the back side against some paper to try and remove some of the non-coloring wax and to smooth out the surface.

Thursday, December 15, 2011

Our Gingerbread Ornaments

Here's a photo of our finished gingerbread people.  This picture is pretty busy--kinda like Where's Waldo.  See if you can spot the Grandma and Grandpa and the missionary.  There's also one in pajamas.

Wednesday, December 7, 2011

Gingerbread Men Ornaments

My kids and I have been having fun doing a craft together this week.  We are making gingerbread men out of salt dough to give as gifts for teachers and friends.  Here's our recipe:

Salt Dough

2 cups flour
3/4 cup salt
about 3/4 cup warm water
1 t vegetable oil

Mix it all together (you'll have to use your hands).  It is better to err on the side of too dry than too wet, as you can always add more water later.  Roll the dough out about 1/4 inch thick, and use cookie cutters to cut shapes.
Use a drinking straw to cut a hole at the top or cut a paper clip with wire cutters.  Insert the paper clip U shape carefully in the top of the cookie, making sure not to go through the front or back.
Lay them out to dry.  It will take a day or two.  Make sure to turn them over every now and then to prevent curling.  It seems letting them dry on a towel helped them to dry quicker.  You can also bake them at 200 degrees for a long time--a few hours.

Once they are dry, paint them with acrylic paint. 

Monday, September 19, 2011

Short Story Contest at LDS Publisher

LDS Publisher is having a writing contest.  (See the button on the bottom right of my blog page.)  I have been thinking about entering, but I haven't had much time to write something.  Becoming a published author is on my "Bucket List," but I have a lot of work to do.  I've written a simple children's story and been rejected by several publishers so far.  It has been a good learning experience to find out how the publishing world works a bit.

Thursday, August 25, 2011

My Daughter's Quilt

This is the second quilt I've ever made.  I made it for Belle to go on her toddler bed, which she no longer has.  The butterflies started to fray after I washed it, so I had to hand stitch the edges down.  That took me forever to do, and I finally finished it this month!  I don't know why the picture turned out with so little detail, but I had to stand on the bed and hold the camera in the air to take the shot.  The butterflies are 3D--the wings aren't stitched down.
Today I am learning how to use Picasa because my old photo editing software is rebelling on me.  So far I haven't figured out how to save a file in a smaller size. And there is something wrong with this shade of green...

I entered it into the county fair just for fun, and I took 3rd place in my division.  It's kinda neat to get a ribbon, but EVERYBODY got a ribbon.  I saw about five quilts in a row that all had 3rd place ribbons on them.  I don't know how it works.  I will have to remember next year to encourage the children to enter something.  They will get a ribbon, and hopefully a boost to their self esteem.  My goal is to learn enough about photography this year to have a worthy photo to enter the fair next year--I mean one that I would feel really proud of.